


Kebijakan Privasi
Target AI
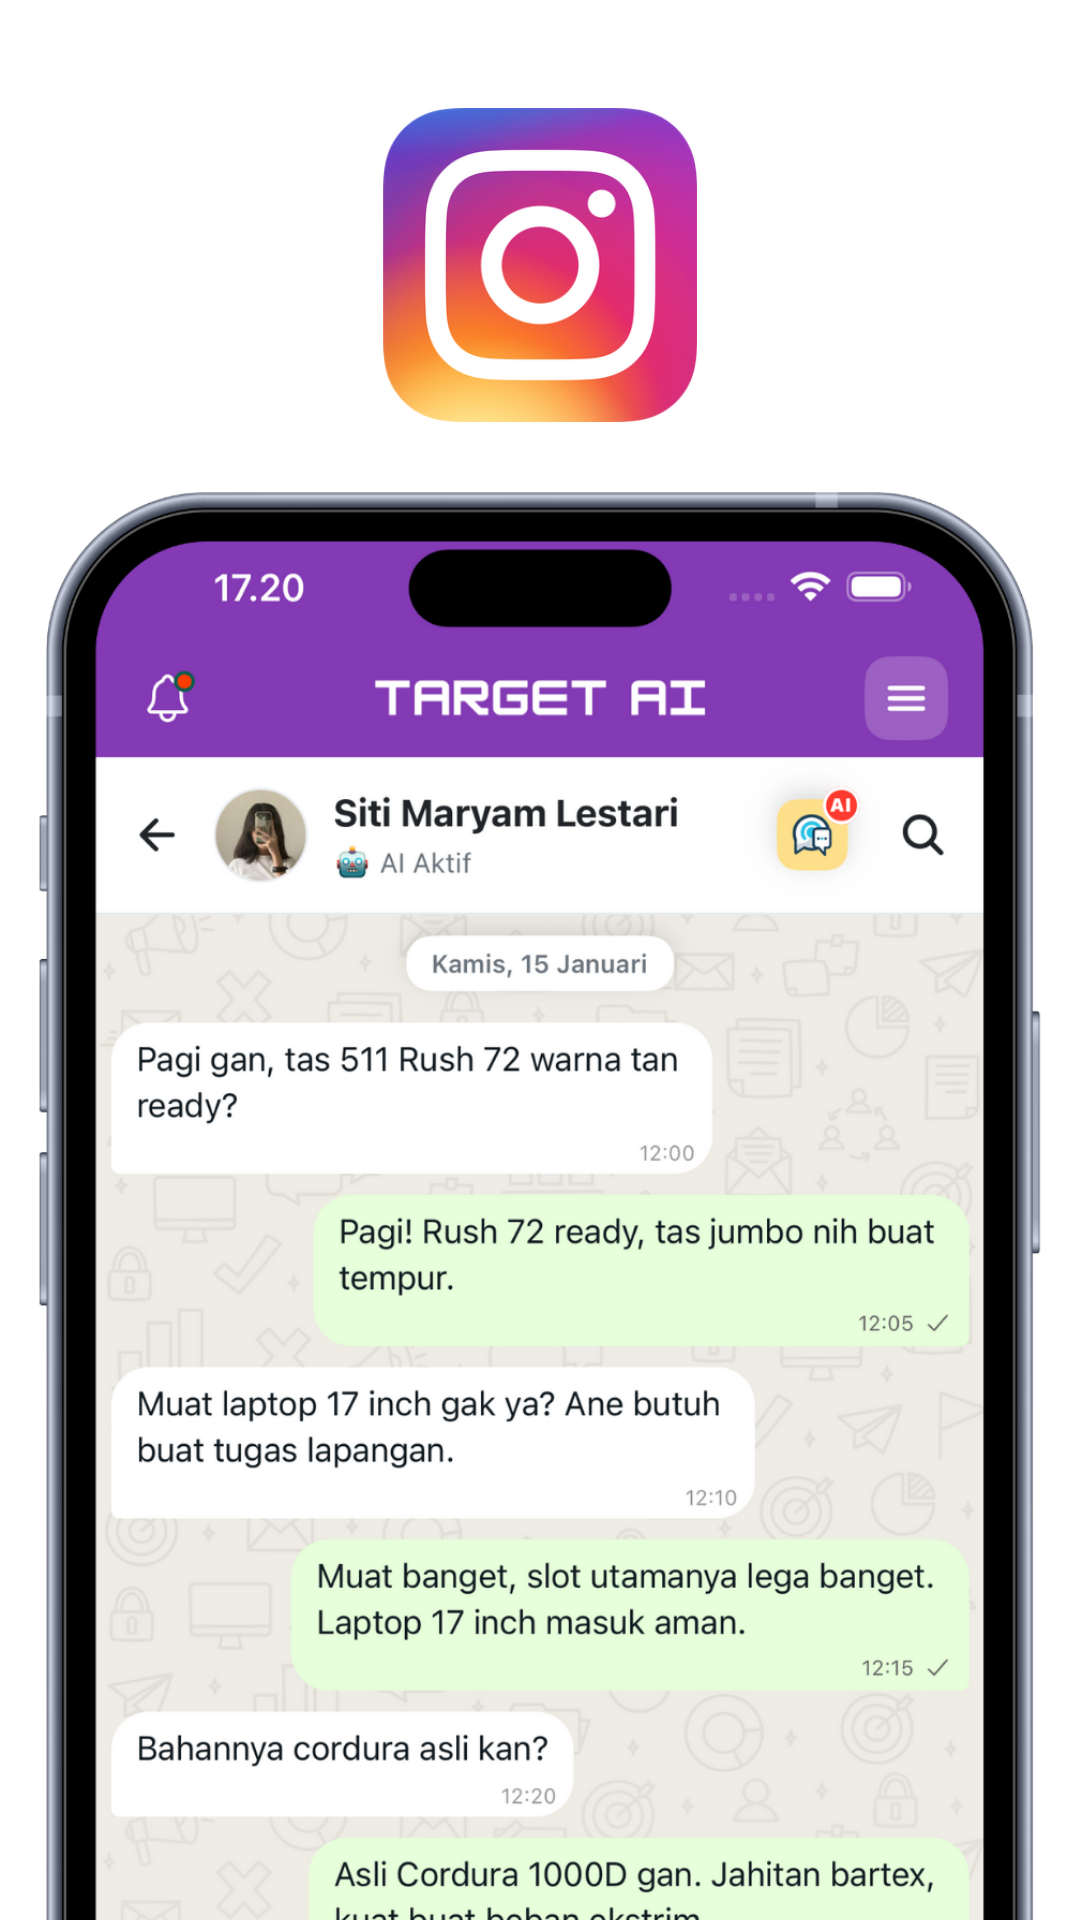
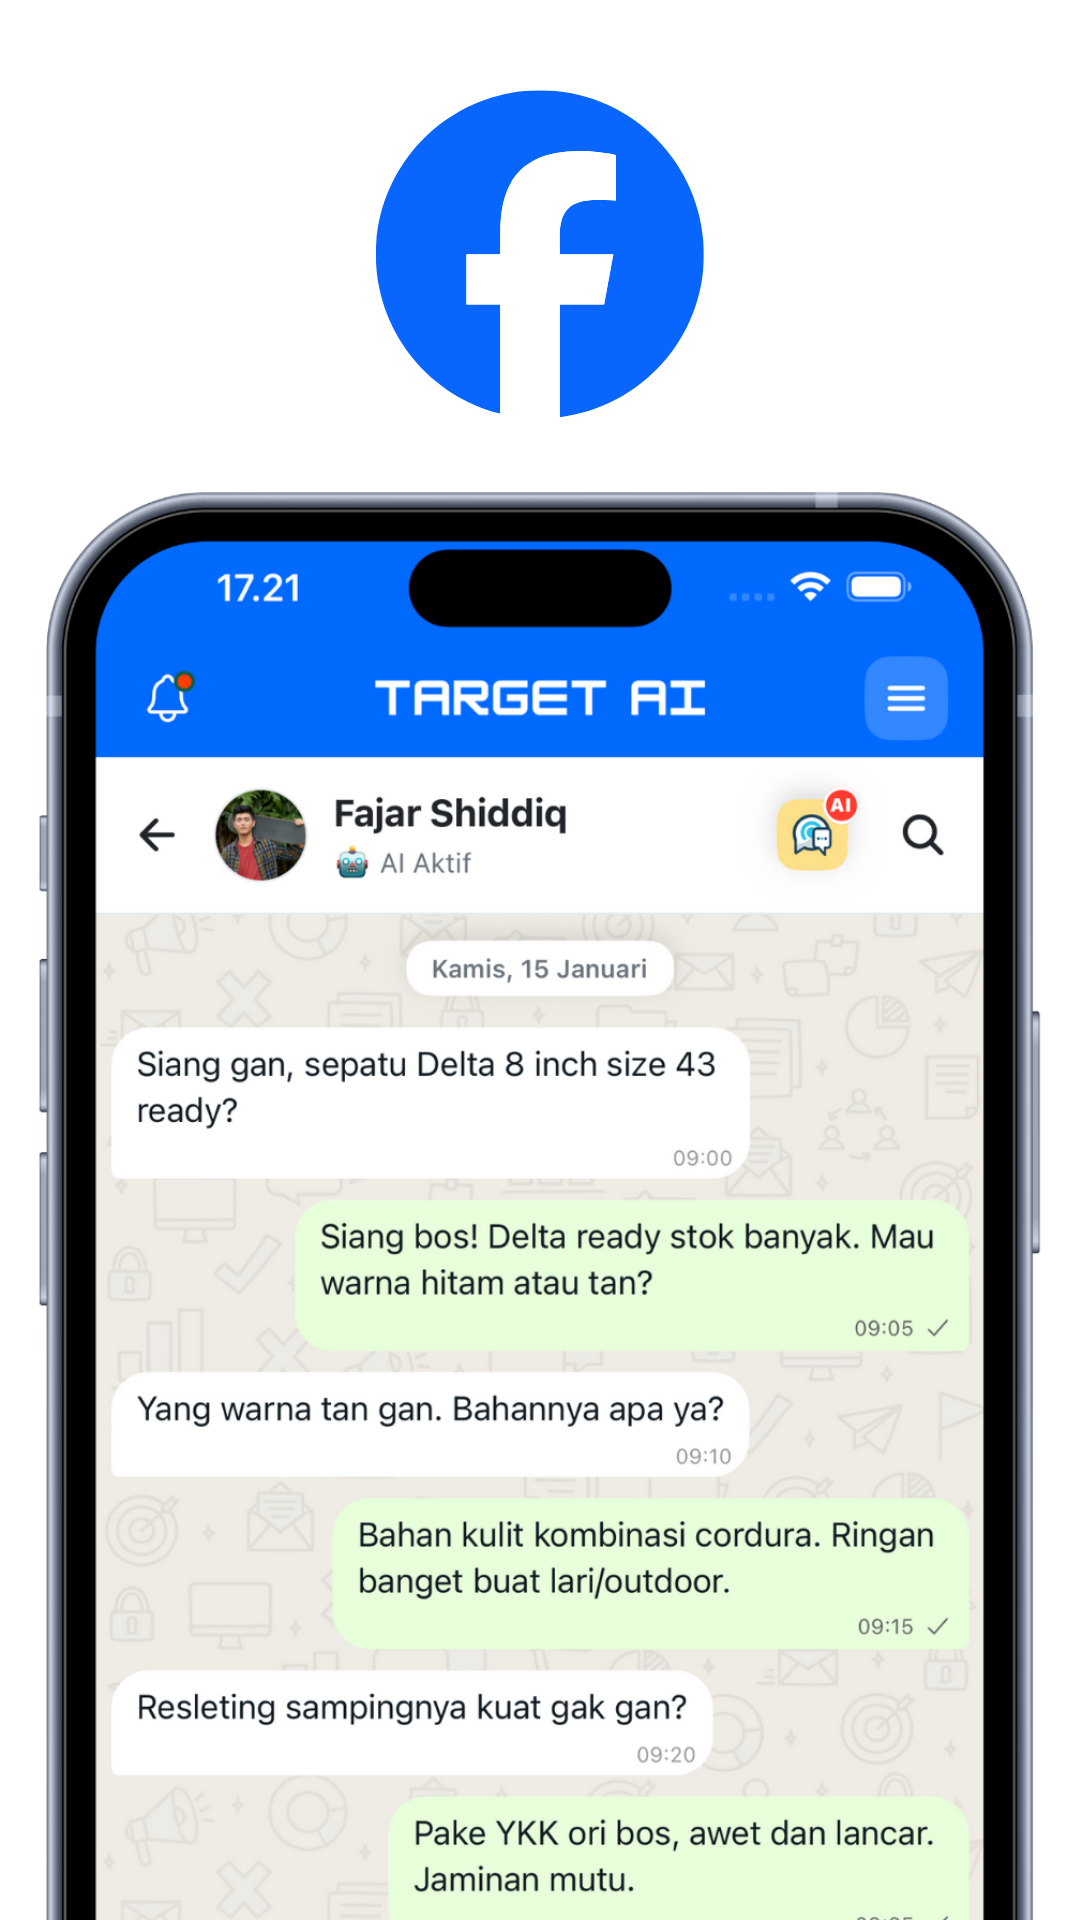
Semua akun media sosial terintegrasi dengan sistem Cerdas AI Chat dari Target AI.

WatBis Complete Guide
Panduan lengkap setup dan dokumentasi semua fitur WatBis - WhatsApp Business Integration System
Quick Start
Mulai gunakan WatBis dalam 5 menit
Download & Install Aplikasi
Download WatBis dari App Store (iOS) atau Google Play (Android), lalu install di device Anda.
Buat Akun & Login
Daftar menggunakan email bisnis Anda. Verifikasi email dan login ke aplikasi.
Connect WhatsApp Business
Ikuti wizard setup untuk menghubungkan WhatsApp Business Account Anda dengan WatBis.
Setup AI Assistant (Opsional)
Konfigurasikan AI Chat Assistant untuk membalas pesan customer secara otomatis.
Mulai Kirim Pesan!
Anda siap untuk mengelola chat, kirim broadcast, dan automasi komunikasi bisnis Anda.
Installation & Setup
Panduan instalasi lengkap untuk semua platform
📱 Mobile App Installation
iOS (iPhone/iPad)
1. Buka App Store
2. Search "WatBis"
3. Tap "Get" untuk install
4. Buka aplikasi setelah install
Android
1. Buka Google Play Store
2. Search "WatBis"
3. Tap "Install"
4. Buka aplikasi setelah install
⚙️ System Requirements
- iOS: iOS 13.0 atau lebih baru
- Android: Android 8.0 (Oreo) atau lebih baru
- Storage: Minimum 100MB free space
- Internet: Koneksi internet stabil (WiFi/4G/5G)
Setup Koneksi WhatsApp Business
Langkah-langkah menghubungkan WhatsApp Business API ke WatBis
Login ke Dashboard WatBis
Buka aplikasi WatBis dan login menggunakan akun Anda.
- Akses: https://app.watbis.com
- Masukkan email dan password
- Klik tombol "Login"
Pilih Menu "WhatsApp Setup"
Dari dashboard utama, cari dan klik menu "WhatsApp Setup" atau "Platform Integration".
- Biasanya ada di sidebar menu atau dashboard card
- Icon berupa logo WhatsApp hijau 💬
Klik Tombol "Connect WhatsApp"
Pada halaman WhatsApp Setup, klik tombol "Hubungkan WhatsApp Business" atau "Connect WhatsApp".
Akan muncul modal popup untuk memulai proses Embedded Signup.
Login Facebook (Embedded Signup)
Anda akan diminta login ke Facebook Business Manager:
- Masukkan email dan password Facebook Anda
- Jika sudah login di browser, akan otomatis terdeteksi
- Ikuti proses 2FA jika diaktifkan
Pilih atau Buat Business Account
Setelah login, Anda akan diminta memilih:
- Business Account yang sudah ada - Jika Anda sudah punya
- Buat Business Account baru - Jika belum punya
Jika membuat baru:
- Masukkan nama bisnis
- Pilih kategori bisnis
- Isi alamat bisnis
Setup Nomor WhatsApp
Pilih salah satu opsi berikut:
Opsi A: Gunakan Nomor Baru
- Pilih negara (Indonesia +62)
- Masukkan nomor baru yang belum terdaftar WhatsApp
- Verifikasi via SMS/Call
Opsi B: Migrate dari WhatsApp Business App
- Pilih nomor yang sudah ada di WhatsApp Business App
- Konfirmasi bahwa nomor akan logout dari app
- Verifikasi kepemilikan nomor
Verifikasi Nomor
WhatsApp akan mengirimkan kode verifikasi via SMS atau call:
- Masukkan 6 digit kode yang diterima
- Jika tidak menerima, request ulang kode
- Atau pilih "Verify via call" untuk menerima via telepon
Kode verifikasi WhatsApp Anda: 123-456
Jangan bagikan kode ini kepada siapapun!
Setup Display Name & Profile
Lengkapi profil bisnis Anda:
- Display Name: Nama bisnis yang akan terlihat customer (max 25 karakter)
- Kategori Bisnis: Pilih kategori yang sesuai (Retail, Pendidikan, dll)
- Deskripsi: Jelaskan tentang bisnis Anda (opsional)
- Alamat: Alamat lengkap bisnis
- Website: URL website bisnis (opsional)
- Email: Email kontak bisnis
Review & Authorize
Terakhir, review semua informasi dan berikan izin akses:
- WatBis akan meminta akses untuk mengelola WhatsApp Business Account Anda
- Review izin yang diminta (send messages, manage templates, dll)
- Klik "Allow" atau "Izinkan"
Verifikasi Koneksi
Setelah setup selesai, pastikan koneksi berhasil dengan memeriksa:
- ✅ Status: "Connected" atau "Terhubung"
- ✅ Nomor telepon muncul dengan benar
- Business Account ID tertera
- ✅ Webhook status: "Verified"
Coba kirim test message untuk memastikan semuanya berfungsi!
Chats Screen
Kelola semua percakapan WhatsApp dalam satu tempat
Chats / Conversations Screen
Screen utama untuk mengelola semua percakapan WhatsApp. Menampilkan daftar chat dengan customer, informasi pesan terakhir, status read/unread, dan quick actions.
✨ Key Features:
- Real-time Chat List: Daftar chat yang update secara real-time
- Search & Filter: Cari chat berdasarkan nama/nomor customer
- Status Indicators: Lihat pesan read/unread, typing indicators
- Quick Reply: Template quick reply untuk respon cepat
- Message Preview: Lihat preview pesan terakhir
- Timestamp: Waktu pesan terakhir (relative time)
- Pull to Refresh: Refresh chat list dengan pull down
- Swipe Actions: Swipe untuk archive, mute, atau delete
🎨 UI Components:
- Search bar dengan icon di header
- Filter tabs (All, Unread, Groups)
- Chat item card dengan avatar, nama, preview, dan badge
- Floating Action Button untuk new chat
- Empty state ketika belum ada chat
User Flow:
Broadcast System
Kirim pesan massal ke ribuan customer sekaligus
📢 Broadcast List Screen
Menampilkan daftar semua campaign broadcast yang pernah dibuat. User bisa melihat status campaign (draft, scheduled, sending, completed), statistik pengiriman, dan manage campaigns.
✨ Key Features:
- Campaign List: Daftar semua broadcast campaigns dengan status
- Quota Display: Lihat sisa quota broadcast Anda
- Status Badges: Visual indicator untuk status campaign
- Statistics: Total sent, delivered, read, failed
- Search & Sort: Cari campaign dan sort by date
- Pagination: Load more campaigns dengan infinite scroll
- Quick Actions: View details, duplicate, atau delete campaign
- Create New: Button untuk create new broadcast
📊 Campaign Status:
- Draft: Campaign belum dikirim
- Scheduled: Dijadwalkan untuk dikirim
- Sending: Sedang dalam proses pengiriman
- Completed: Sudah selesai dikirim
- Failed: Gagal dikirim
✍️ Create Broadcast Screen
Form wizard untuk membuat campaign broadcast baru. User bisa pilih template, select recipients, personalize message dengan variables, attach media, dan schedule pengiriman.
Key Features:
- Template Selection: Pilih dari template yang sudah approved Meta
- Recipients Selector: Pilih contact groups atau individual contacts
- Variable Personalization: Isi variable {{1}}, {{2}} dll dengan data dynamic
- Media Upload: Attach image, video, atau document
- Template Preview: Real-time preview template dengan data sample
- Schedule Options: Send now atau schedule untuk waktu tertentu
- Quota Warning: Alert jika quota tidak mencukupi
- Validation: Auto-validate sebelum send (template, recipients, variables)
🔄 Creation Flow:
Manajemen Kontak & Grup
Kelola database customer dengan efektif
Contact Management adalah fitur untuk mengelola database customer Anda. Anda bisa menambah, edit, import, dan mengelompokkan kontak untuk targeting yang lebih baik.
Cara Menambah Kontak:
Menambah Kontak Manual
Untuk menambah kontak satu per satu:
- Buka menu "Kontak" atau "Contacts"
- Klik tombol "+ Tambah Kontak"
- Isi form:
- Nama: Nama lengkap customer
- Nomor Telepon: Format internasional (08xxx atau +628xxx)
- Email: Email customer (opsional)
- Grup: Pilih grup yang sesuai (opsional)
- Klik "Simpan"
Import Kontak dari CSV/Excel
Untuk import banyak kontak sekaligus:
- Siapkan file CSV atau Excel dengan kolom:
name- Nama kontakphone- Nomor teleponemail- Email (opsional)groups- Nama grup (opsional)
- Klik tombol "Import Kontak"
- Upload file CSV/Excel
- Mapping kolom jika perlu
- Klik "Proses Import"
name,phone,email,groups
Budi Santoso,081234567890,budi@email.com,Premium Customer
Ani Wijaya,081234567891,ani@email.com,Regular Customer
Dedi Kurniawan,081234567892,dedi@email.com,VIP
Manajemen Grup:
Grup membantu Anda mengorganisir kontak berdasarkan kategori, lokasi, atau karakteristik lainnya. Anda bisa mengirim broadcast ke grup tertentu tanpa harus pilih kontak satu per satu.
Membuat Grup Baru
- Buka tab "Grup" di halaman Kontak
- Klik "+ Buat Grup"
- Masukkan nama grup (contoh: "Customer Jakarta", "VIP Member", "Leads Januari")
- Klik "Simpan"
Menambahkan Kontak ke Grup
Cara 1: Dari List Kontak
- Pilih kontak yang ingin ditambahkan (centang checkbox)
- Klik "Tambah ke Grup"
- Pilih grup tujuan
- Klik "Simpan"
Cara 2: Dari Detail Grup
- Buka detail grup
- Klik "Tambah Anggota"
- Pilih kontak dari list
- Klik "Tambahkan"
Mengelola Anggota Grup
Untuk melihat dan mengelola anggota grup:
- Klik nama grup untuk melihat detail
- Anda akan melihat list semua anggota
- Klik icon ❌ untuk remove anggota dari grup
- Search untuk cari anggota tertentu
Fitur-fitur Contact Management:
Search & Filter
Cari kontak berdasarkan nama, nomor, atau grup dengan mudah
Edit Kontak
Update informasi kontak kapan saja
Delete Kontak
Hapus kontak yang tidak aktif atau duplikat
Export Data
Download database kontak dalam format CSV/Excel
Multi-Group
Satu kontak bisa masuk ke beberapa grup sekaligus
Sorting
Urutkan kontak berdasarkan nama, tanggal, atau custom field
- Buat grup berdasarkan behavior atau demografi customer
- Gunakan naming convention yang konsisten untuk grup
- Regular cleanup: hapus kontak invalid atau bounce
- Backup database kontak secara berkala
- Jangan spam: kirim pesan hanya ke kontak yang relevan
Store Management System
Kelola toko online Anda dengan fitur lengkap e-commerce
🎨 Store Branding Settings
Pengaturan lengkap untuk branding toko online Anda. Kelola identitas visual, informasi kontak, metode pembayaran, dan semua aspek presentasi toko Anda kepada pelanggan.
✨ Key Features:
- Custom Store URL (Slug): Buat URL unik untuk toko Anda (contoh: tokoku.watbis.store)
- Logo & Favicon Upload: Upload logo toko dan favicon dengan preview real-time
- Site Information: Set nama toko, tagline, dan SEO title
- Business Hours: Atur jam operasional toko dengan timezone
- Contact Details: Kelola alamat, nomor telepon, dan email
- Bank Accounts: Tambah multiple rekening bank untuk pembayaran transfer
- COD Settings: Enable/disable Cash on Delivery
- Social Media Links: Integrasi dengan Facebook, Instagram, YouTube, TikTok
- Marketplace Links: Link ke Shopee, Tokopedia, Lazada
- Google Maps: Embed lokasi toko untuk customer
🏦 Bank Account Management:
Tambah Rekening
Add unlimited bank accounts dengan detail:
- Nama Bank (BCA, Mandiri, BNI, BRI, dll)
- Nomor Rekening
- Nama Pemilik Rekening
- Cabang Bank (opsional)
Edit & Hapus
Kelola rekening yang sudah ada:
- Edit informasi rekening
- Toggle aktif/nonaktif
- Hapus rekening
- Reorder prioritas tampilan
🌐 Custom Store Slug:
📍 Location & Contact Settings:
Input alamat toko lengkap dengan nomor jalan, kelurahan, kecamatan, kota, dan kode pos. Informasi ini akan ditampilkan di halaman checkout dan footer toko.
Set jam buka dan tutup untuk setiap hari dalam seminggu. Format: "Senin-Jumat 09:00-18:00, Sabtu 09:00-15:00, Minggu Tutup"
Nomor WhatsApp dan email yang bisa dihubungi customer untuk pertanyaan atau komplain.
🎯 User Flow - Store Branding:
🖼 Banner Management
Kelola banner promosi yang ditampilkan di homepage toko. Banner carousel untuk highlight promo, produk baru, atau event khusus.
✨ Banner Features:
- Multiple Banners: Upload unlimited banners untuk carousel
- Image Upload: Support JPEG/PNG, max 5MB per image
- URL Linking: Set link tujuan saat banner di-click
- Order Management: Drag & drop untuk reorder banner sequence
- Enable/Disable: Toggle banner aktif/nonaktif tanpa menghapus
- Auto Carousel: Banner auto-rotate di storefront
Rekomendasi Ukuran Banner:
| Device | Ukuran Optimal | Ratio | Keterangan |
|---|---|---|---|
| Desktop | 1920x600px | 16:5 | Full width banner |
| Mobile | 1080x1080px | 1:1 | Square banner |
| Universal | 1600x900px | 16:9 | Best for all devices |
📦 Product Management System
Comprehensive product management dengan support untuk produk fisik, digital, dan jasa. Kelola ribuan produk dengan mudah, lengkap dengan variant, stok, dan pricing.
✨ Product Management Features:
- Product Types: Physical, Digital, Service/Jasa
- Category Management: Create unlimited categories dengan nested structure
- Multi-Image Upload: Upload hingga 10 gambar per produk
- Product Variants: Support warna, ukuran, model dengan stock & price per variant
- Stock Tracking: Real-time inventory management
- Pricing: Regular price & discount price dengan percentage calculator
- SKU Management: Generate atau custom SKU untuk tracking
- Product Description: Rich text editor dengan formatting
- Branch Assignment: Assign produk ke specific branches
- Staff Assignment: Delegate product management ke staff
- Bulk Actions: Edit, delete, export multiple products sekaligus
- Search & Filter: Filter by category, type, stock status, price range
Product Types Explained:
📦 Physical Product
Untuk: Barang yang dikirim secara fisik
- Memerlukan shipping
- Ada berat dan dimensi
- Stock management ketat
- Contoh: Sepatu, Baju, Elektronik
💿 Digital Product
Untuk: Produk downloadable
- No shipping required
- Instant delivery via email/link
- Unlimited stock
- Contoh: Ebook, Software, Template
⚙️ Service/Jasa
Untuk: Layanan & booking
- Time-based availability
- Booking/appointment system
- Duration management
- Contoh: Konsultasi, Spa, Kursus
🏷️ Category Management:
Tap "Kelola Kategori" → Input nama kategori → Tap "Tambah". Category akan langsung tersedia untuk product assignment.
Tap icon edit di samping kategori → Ubah nama → Tap checkmark. Semua produk dalam kategori akan ter-update otomatis.
Tap icon trash → Konfirmasi hapus. Produk dalam kategori tidak akan terhapus, hanya categorynya yang akan di-unassign.
🎯 Creating a Product - Step by Step:
🔄 Product Variants Explained:
Variants adalah opsi berbeda dari satu produk yang sama. Contoh:
| Variant Type | Common Options | Use Case |
|---|---|---|
| Warna | Hitam, Putih, Merah, Biru, etc | Fashion, Aksesoris, Elektronik |
| Ukuran | XS, S, M, L, XL, XXL | Pakaian, Sepatu |
| Model | Basic, Premium, Deluxe | Electronics, Services |
| Material | Cotton, Polyester, Wool | Textiles, Furniture |
| Kapasitas | 16GB, 32GB, 64GB, 128GB | Storage devices, Phones |
📝 Product Form Fields:
| Field | Type | Required | Description |
|---|---|---|---|
| name | Text | ✅ Yes | Nama produk (max 200 karakter) |
| product_type | Select | ✅ Yes | physical | digital | service |
| category_id | Select | No | ID kategori produk |
| price | Number | ✅ Yes | Harga normal (Rupiah) |
| discount_price | Number | ❌ No | Harga setelah diskon |
| description | Textarea | ❌ No | Deskripsi lengkap produk |
| stock | Number | ✅ Yes* | *Jika tidak ada variant |
| sku | Text | ❌ No | Auto-generated jika kosong |
| weight | Number | ❌ No | Berat dalam gram (physical only) |
| duration | Number | ❌ No | Durasi dalam menit (service only) |
| images | Array | ❌ No | Array of image URLs (max 10) |
| variants | JSON | ❌ No | Variant configuration object |
🎯 User Flow - Product Management:
💿 Digital Product Management
Specialized management untuk produk digital seperti ebook, software, template, course, dan file downloadable lainnya. Includes download tracking dan license management.
✨ Digital Product Features:
- File Upload: Upload produk digital (PDF, ZIP, MP4, etc) max 100MB
- Download Link: Auto-generate secure download links
- Download Limits: Set jumlah max download per purchase
- Link Expiry: Set expiry time untuk download links
- License Keys: Generate unique license keys per purchase
- Access Control: Only paid customers can download
- Download Analytics: Track who downloaded, when, and how many times
- Version Control: Upload updated versions, notify customers
- Instant Delivery: Email download link setelah payment confirmed
📊 Download Analytics:
Track dan analyze download activity untuk setiap digital product:
- Total downloads per product
- Unique downloaders count
- Download history dengan timestamp
- Customer info per download
- Average download time
- Failed download attempts
Security Features:
Secure Links
Download links di-encrypt dan time-limited untuk prevent unauthorized access.
IP Tracking
Track IP address per download untuk detect abuse atau sharing links.
License Validation
Validate license keys untuk software products sebelum activation.
🎫 Voucher & Discount System
Create dan kelola voucher discount untuk promo campaigns. Support percentage discount, fixed amount discount, dengan conditional rules dan usage limits.
✨ Voucher Features:
- Voucher Code: Custom atau auto-generated unique codes
- Discount Types: Percentage (%) atau Fixed Amount (Rp)
- Min Order: Set minimum order amount untuk gunakan voucher
- Max Discount: Cap maximum discount untuk percentage vouchers
- Usage Limit: Total berapa kali voucher bisa digunakan
- User Limit: Limit per user (sekali atau multiple)
- Valid Period: Set start date dan expiry date
- Product/Category Specific: Apply hanya untuk produk/kategori tertentu
- First Time User: Special voucher untuk new customers
- Auto Apply: Auto-apply voucher di checkout
🎯 Voucher Types:
💯 Percentage Discount
Example: DISKON20
- Value: 20%
- Min Order: Rp 100,000
- Max Discount: Rp 50,000
- Good for: High-value orders
💰 Fixed Amount
Example: HEMAT50K
- Value: Rp 50,000
- Min Order: Rp 200,000
- Max Discount: N/A
- Good for: Specific campaigns
🎁 Free Shipping
Example: GRATIS-ONGKIR
- Value: Shipping cost
- Min Order: Rp 150,000
- Type: Special voucher
- Good for: Increase AOV
📝 Creating a Voucher:
🎮 Voucher Management Actions:
| Action | Description | Use Case |
|---|---|---|
| Edit | Modify voucher details | Update discount value, extend expiry |
| Duplicate | Clone existing voucher | Create similar voucher untuk campaign baru |
| Disable | Temporarily deactivate | Pause campaign tanpa hapus data |
| Delete | Permanently remove | Clean up expired/unused vouchers |
| View Stats | See usage analytics | Track campaign performance |
📊 Voucher Analytics:
Monitor performa setiap voucher:
- Total Usage Count (berapa kali digunakan)
- Total Discount Given (total potongan diberikan)
- Total Revenue Generated (GMV dari voucher)
- Unique Users Count (berapa customer beda)
- Conversion Rate (redemption vs share)
- Average Order Value dengan voucher
📋 Order Management & Processing
Comprehensive order management system untuk handle customer orders dari placement hingga fulfillment. Track status, manage inventory, dan coordinate dengan logistics.
✨ Order Management Features:
- Order Dashboard: View semua orders dalam satu dashboard
- Status Tracking: Real-time order status updates
- Payment Verification: Confirm manual transfer payments
- Invoice Generation: Auto-generate invoices per order
- Shipping Integration: Get tracking number dari kurir
- Customer Communication: Send updates via WhatsApp/email
- Refund Processing: Handle returns dan refunds
- Bulk Actions: Process multiple orders sekaligus
- Order Notes: Internal notes untuk setiap order
- Print Labels: Print shipping labels dan packing slips
🔄 Order Status Flow:
Order baru masuk, menunggu customer untuk bayar. Auto-cancel jika tidak dibayar dalam 24 jam.
Customer upload bukti transfer, admin verify pembayaran. Mark as "Paid" jika valid.
Order sedang di-pack. Update inventory, siapkan barang, print shipping label.
Barang sudah dikirim. Input tracking number, notify customer dengan link tracking.
Paket sudah sampai ke customer. Request review dan rating.
Order selesai, tidak ada komplain. Revenue recorded, analytics updated.
Order Details:
Informasi yang tersimpan dalam setiap order:
🎯 Processing Orders - Admin Flow:
🚚 Shipping & Logistics Integration
Integrated shipping calculator dengan major couriers di Indonesia. Auto-calculate ongkir based on weight, destination, dan courier service.
✨ Shipping Features:
- Multi-Courier Support: JNE, J&T, SiCepat, Ninja Xpress, AnterAja, dll
- Real-time Rates: Get shipping cost real-time dari API courier
- Service Options: REG, YES, OKE, dan berbagai service levels
- ETD Estimation: Perkiraan waktu tiba per service
- Origin City Setup: Set warehouse/store location sebagai origin
- Weight Calculator: Auto-calculate dari product weight
- Tracking Integration: Link tracking number dengan courier website
- Shipping Labels: Generate dan print shipping labels
🚚 Supported Couriers:
| Courier | Services | Coverage | Features |
|---|---|---|---|
| JNE | REG, YES, OKE | Nationwide | Tracking, Insurance, COD |
| J&T Express | REG, EZ | Nationwide | Tracking, COD |
| SiCepat | REG, BEST, GOKIL | Java & Major Cities | Fast delivery, Tracking |
| Ninja Xpress | Standard, Instant | Nationwide | Tracking, COD, Same-day |
| AnterAja | Regular, Next Day | Java & Sumatra | Tracking, COD |
| POS Indonesia | Paket Kilat, Express | Nationwide + Remote | Cheapest, Wide coverage |
⚙️ Shipping Setup:
Go to Store Settings → Shipping → Select province → Select city. Ini adalah lokasi warehouse/toko Anda sebagai origin pengiriman.
Select courier mana yang ingin Anda aktifkan. Bisa multiple couriers, customer akan diberi pilihan di checkout.
Test shipping calculator dengan input destination dan weight. Verify rates sesuai dengan official tarif courier.
💰 Shipping Cost Calculation:
💵 Cash on Delivery (COD) Management
Enable Cash on Delivery untuk customer yang prefer bayar saat terima barang. Integrated dengan courier COD services.
✨ COD Features:
- Toggle Enable/Disable: Aktifkan atau nonaktifkan COD
- COD Fee: Set additional fee untuk COD orders (optional)
- Min Order COD: Set minimum order untuk bisa COD
- Coverage Area: Limit COD untuk area tertentu
- Auto-approval: COD orders auto-approved tanpa payment proof
- Courier Integration: Hanya courier yang support COD yang muncul
⚙️ COD Setup:
📊 COD Order Flow:
Customer pilih COD di checkout → Order created dengan status "Processing"
Pack barang → Arrange pickup dengan courier COD → Input tracking number
Courier deliver → Customer bayar tunai → Courier confirm to admin
Courier transfer uang COD ke rekening seller (biasanya H+3 atau H+7)
Template Management
Cara membuat dan mengelola template pesan WhatsApp
Template adalah format pesan yang sudah disetujui oleh WhatsApp untuk digunakan dalam broadcast atau memulai percakapan dengan customer. Template harus melalui proses approval dari Meta/WhatsApp sebelum bisa digunakan.
Kenapa Perlu Template?
- WhatsApp Business API hanya bisa memulai percakapan dengan customer menggunakan template yang sudah diapprove
- Melindungi customer dari spam dan pesan marketing yang tidak diinginkan
- Memastikan pesan yang dikirim sesuai dengan kebijakan WhatsApp
- Template gratis untuk kategori tertentu (utility, authentication)
Jenis-jenis Template:
Marketing
Promosi produk, penawaran khusus, info diskon. Template berbayar.
Utility
Notifikasi transaksi, update pesanan, reminder. Template gratis dalam 24 jam.
Authentication
OTP, verifikasi akun, reset password. Template gratis.
Cara Membuat Template:
Buka Menu Templates
Di dashboard WatBis, pilih menu "Templates" atau "Template Management".
Anda akan melihat list template yang sudah ada beserta statusnya.
Klik "Buat Template Baru"
Klik tombol "+ Buat Template" atau "Create New Template".
Form pembuatan template akan muncul.
Isi Informasi Dasar
Nama Template:
- Hanya lowercase, angka, dan underscore (_)
- Tidak boleh ada spasi
- Contoh:
promo_ramadhan_2025,konfirmasi_pesanan
Kategori:
- MARKETING - Untuk promosi dan marketing
- UTILITY - Untuk notifikasi transaksi/order
- AUTHENTICATION - Untuk OTP dan verifikasi
Bahasa: Pilih bahasa template (Indonesia, English, dll)
Setup Header (Opsional)
Header adalah bagian paling atas dari template. Pilih tipe header:
Text Header:
- Maksimal 60 karakter
- Bisa menggunakan variable ({{1}})
- Contoh:
Halo {{1}}, Promo Spesial Untukmu!
Media Header (Image/Video/Document):
- Upload sample media (akan jadi contoh saat review)
- Media asli akan diupload saat mengirim broadcast
- Format: JPG, PNG, MP4, PDF
Halo {{1}}, Ada Promo Khusus!

Variable {{1}} akan diganti dengan nama customer saat broadcast
Tulis Body Message (Wajib)
Body adalah isi pesan utama. Ketentuan:
- Maksimal 1024 karakter
- Bisa menggunakan multiple variables ({{1}}, {{2}}, {{3}}, dst)
- Gunakan \n untuk line break
- Boleh menggunakan emoji 😊
Halo {{1}}! 🎉

Ada promo spesial di {{2}} untuk kamu!
Diskon hingga {{3}}% untuk semua produk.

Periode promo: {{4}}
Kode voucher: {{5}}

Jangan sampai kehabisan ya! ️
Example Variables: Berikan contoh nilai untuk setiap variable agar reviewer WhatsApp bisa melihat preview.
- {{1}} = "Budi"
- {{2}} = "Toko Elektronik"
- {{3}} = "50"
- {{4}} = "1-31 Januari 2025"
- {{5}} = "PROMO2025"
Tambahkan Footer (Opsional)
Footer adalah text kecil di bagian bawah pesan:
- Maksimal 60 karakter
- Tidak bisa menggunakan variable
- Biasanya untuk disclaimer atau info kontak
© 2025 Toko Anda | CS: 0812-3456-7890
Setup Buttons (Opsional)
Buttons membuat template lebih interaktif. Ada 3 jenis:
Quick Reply Buttons:
- Maksimal 3 buttons
- Text maksimal 20 karakter
- Untuk respons cepat dari customer
- Contoh: "Ya, Tertarik", "Info Lebih Lanjut", "Tidak, Terima Kasih"
Call-to-Action URL:
- Maksimal 2 buttons
- Link ke website atau landing page
- Bisa dynamic URL dengan variable
- Contoh: "Lihat Katalog", "Beli Sekarang"
Call Phone Number:
- Hanya 1 button
- Langsung menelepon nomor yang ditentukan
- Contoh: "Hubungi CS"
Preview & Submit
Sebelum submit, preview template Anda:
- Pastikan tidak ada typo
- Cek semua variable sudah benar
- Test dengan data sample
- Pastikan sesuai dengan kebijakan WhatsApp
Jika sudah yakin, klik "Submit untuk Review" atau "Kirim ke WhatsApp".
Tunggu Approval
Proses review oleh WhatsApp biasanya memakan waktu:
- ⚡ Cepat: 30 menit - 2 jam
- ⏱️ Normal: 2 - 24 jam
- 🐌 Lama: 24 - 48 jam
Status Template:
- 🟡 PENDING: Sedang di-review WhatsApp
- APPROVED: Template disetujui dan siap digunakan
- ❌ REJECTED: Template ditolak (cek alasan penolakan)
Kebijakan Template WhatsApp:
- Mengandung clickbait atau misleading information
- Menjual produk ilegal (rokok, alkohol, judi, dll)
- Mengandung konten dewasa atau tidak pantas
- Menggunakan kategori yang salah (marketing dikategorikan utility)
- Template terlalu umum dan tidak jelas tujuannya
- Mengandung threatening language
- Format atau grammar buruk
Tips Template Disetujui:
- Gunakan bahasa yang sopan dan profesional
- Jelas dan spesifik tentang tujuan pesan
- Berikan value ke customer, bukan hanya hard selling
- Sertakan opt-out instruction untuk marketing template
- Gunakan kategori yang tepat
- Berikan contoh variable yang realistis
- Ikuti format yang benar (jangan ALL CAPS)
Contacts Management
Kelola database customer dan contact groups
👥 Contacts Screen
Manage semua contact customer Anda. Bisa add, edit, delete contacts, organize ke dalam groups, import dari CSV, dan export contact list.
✨ Key Features:
- Contact List: Daftar semua contact dengan avatar dan info
- Search: Cari contact by nama atau nomor WhatsApp
- Groups Management: Create dan manage contact groups
- Bulk Import: Import contacts dari CSV file
- Export: Export contact list ke CSV/Excel
- Quick Actions: Call, message, edit, atau delete contact
- Custom Fields: Tambah custom fields untuk metadata
- Tags: Tag contacts untuk segmentasi
Contact Groups:
- Create unlimited contact groups
- Add/remove contacts from groups
- Bulk assign contacts to groups
- Use groups untuk broadcast targeting
Import/Export:
Message Templates
Kelola template pesan WhatsApp Business
Templates Screen
Manage semua message templates untuk broadcast dan auto-reply. Create, edit, submit untuk approval Meta, dan lihat status approval (pending/approved/rejected).
✨ Key Features:
- Template List: Daftar semua templates dengan status approval
- Create Template: Form builder untuk buat template baru
- Template Preview: Real-time preview dengan sample data
- Variable Support: Dynamic variables {{1}}, {{2}}, {{name}}, dll
- Media Support: Header dengan image/video/document
- Quick Reply Buttons: Tambah button CTA (up to 3)
- Submit for Approval: Submit ke Meta untuk review
- Status Tracking: Track approval status dari Meta
📝 Template Structure:
- Header: Text, image, video, atau document
- Body: Main message content (max 1024 chars)
- Footer: Optional footer text (max 60 chars)
- Buttons: Quick Reply atau Call-to-Action buttons
✅ Approval Status:
- Pending: Waiting for Meta review
- Approved: Ready to use
- Rejected: Tidak memenuhi policy Meta
- Harus follow WhatsApp Business Policy
- Tidak boleh spam atau promotional berlebihan
- Harus provide value ke customer
- Review time: 1-2 hari kerja
AI Assistant Settings
Konfigurasi AI Chatbot untuk auto-reply
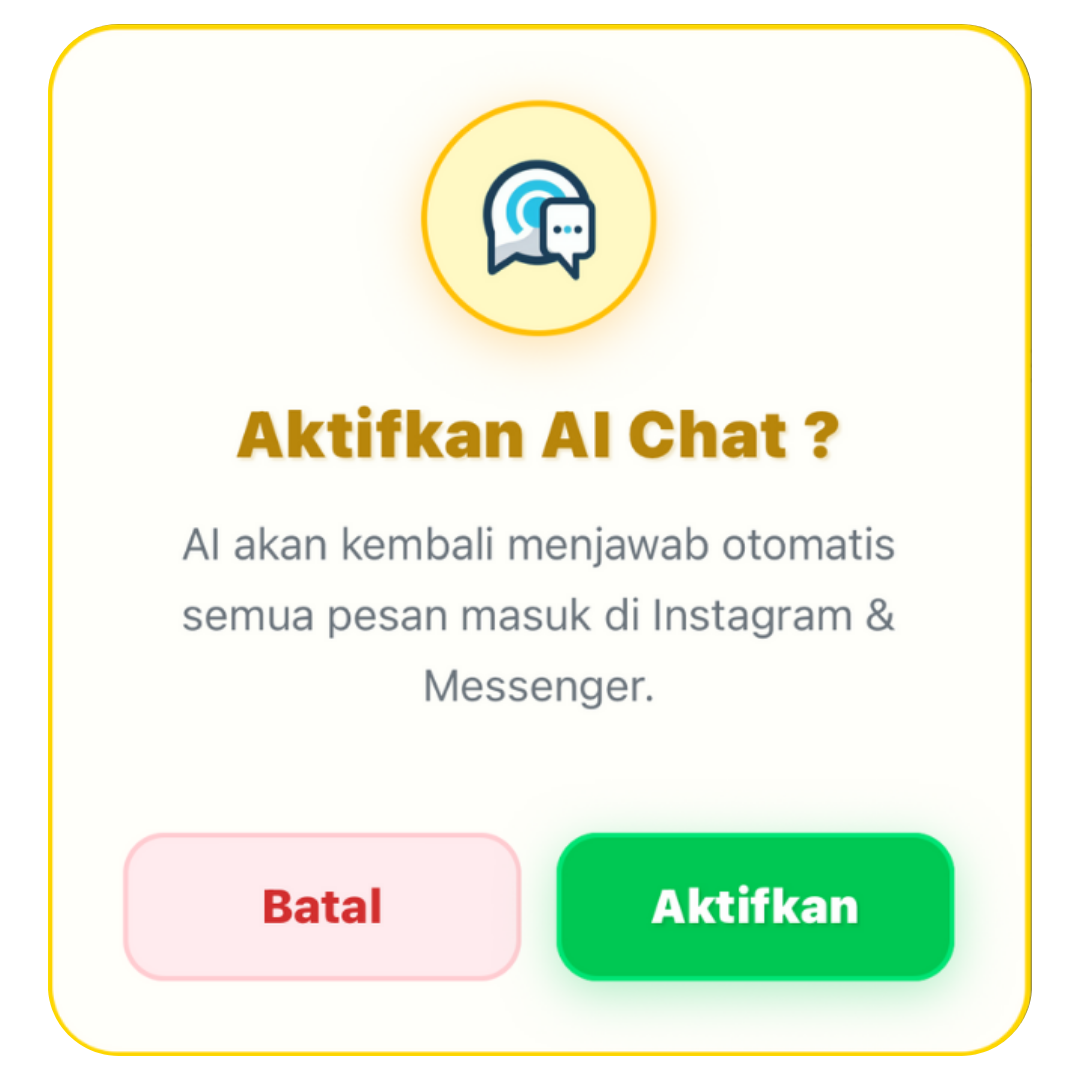
⚙️ AI Settings Screen
Screen comprehensive untuk setup dan configure AI Chat Assistant. User bisa customize personality, response style, enable/disable features, set business context, dan train AI dengan knowledge base.
✨ Key Features:
- Enable/Disable AI: Toggle AI assistant on/off
- Business Type: Pilih tipe bisnis (retail, F&B, service, dll)
- Response Style: Friendly, professional, casual, atau formal
- AI Name: Customize nama AI assistant
- Personality Setup: Define AI personality dan tone
- Custom Prompts: Advanced prompt engineering
- Greeting Message: Set auto-greeting untuk new chat
- Fallback Message: Message ketika AI tidak bisa jawab
- Context Settings: Max context messages untuk conversation history
- Session Timeout: Auto-reset conversation after X hours
Advanced Features:
- Auto Follow-up: AI otomatis follow-up jika customer tidak respon
- Product Recommendation: AI bisa recommend products
- Order Processing: Handle order via chat
- Booking System: Integrate dengan booking calendar
- Image Sending: AI bisa kirim image product
- Multiple Messages: Kirim beberapa message sekaligus (natural)
- Human Delays: Simulate human typing speed
- Typing Indicators: Show "typing..." indicator
- Emoji Usage: AI bisa pakai emoji dalam response
- Casual Responses: Pakai bahasa casual/santai
- Sentiment Analysis: Detect customer sentiment
- Intent Detection: Understand customer intent
💾 Save & Test:
📚 Knowledge Base Management
Train AI dengan data bisnis Anda. Upload dokumen, FAQ, product info, dan business context agar AI bisa jawab pertanyaan customer dengan akurat.
Knowledge Base Features:
- Document Upload: Upload PDF, DOCX, TXT files
- FAQ Database: Add Q&A pairs untuk common questions
- Product Catalog: Import product database dengan detail
- Business Info: Store business hours, lokasi, contact, dll
- Pricing Data: Upload price list untuk referensi AI
- Search & Edit: Manage knowledge base entries
- Auto-sync: Knowledge base auto-available untuk AI
📝 Knowledge Entry Format:
Flow Builder & Automation
Buat WhatsApp Flows dan automation workflows
Flow List Screen
Daftar semua WhatsApp Flows yang sudah dibuat. Flows adalah interactive forms yang bisa dikirim ke customer untuk collect data (survey, order form, booking, dll).
✨ Key Features:
- Flow List: Semua flows dengan status dan stats
- Create New Flow: Button untuk buat flow baru
- Edit Flow: Modify existing flow dengan builder
- Duplicate Flow: Clone flow untuk template
- Delete Flow: Remove flow yang tidak dipakai
- Publish/Unpublish: Control flow availability
- View Submissions: Lihat semua responses dari customer
- Analytics: Flow performance metrics
️ Flow Form Builder
Visual builder untuk create dan edit WhatsApp Flows. Drag-and-drop interface untuk add components, configure screens, set logic, dan preview flow sebelum publish.
✨ Builder Features:
- Visual Editor: Drag-and-drop component catalog
- Multi-screen Support: Create flows dengan multiple screens
- Component Library: 10+ component types (text input, dropdown, radio, checkbox, image, dll)
- Screen Management: Add, delete, reorder screens
- Component Properties: Configure label, placeholder, validation, required, dll
- Navigation Logic: Set screen flow dan conditional logic
- Live Preview: Real-time preview di mobile view
- Fetch from WhatsApp: Import existing flow dari WhatsApp
- Sync to WhatsApp: Publish flow ke WhatsApp Business
📦 Available Components:
- Section: Header/divider untuk grouping
- Image: Display image (logo, product, dll)
- Text Input: Single-line text field
- Email Input: Email field dengan validation
- Number Input: Numeric input
- Date Picker: Select date
- Textarea: Multi-line text input
- Dropdown: Select dari options
- Radio Buttons: Single choice
- Checkbox: Multiple choice
🔄 Builder Workflow:
📊 Flow Submissions Screen
Lihat semua submissions/responses dari customer yang sudah isi flow form. Bisa filter by flow, status, date, search, dan export ke CSV.
✨ Key Features:
- Submissions List: Semua responses dengan detail
- Filter by Flow: Lihat submissions per flow
- Status Filter: New, processed, completed
- Search: Cari by customer name/phone
- Date Range: Filter by submission date
- View Details: Expand untuk lihat full response
- Export CSV: Download submissions data
- Mark as Processed: Update status submission
📈 Submission Data:
Jobs & Tasks Management
Personal task manager dan job scheduler
📅 Jobs Screen
Personal productivity tool untuk manage tasks, to-do lists, dan schedule jobs. Built-in dalam WatBis untuk help user organize bisnis activities.
✨ Key Features:
- Task List: Semua tasks dengan status dan priority
- Create Task: Quick add task dengan detail lengkap
- Categories: Organize tasks by category (work, personal, urgent, dll)
- Priority Levels: Low, Normal, High, Urgent
- Due Date: Set deadline dan reminder
- Reminders: Push notification sebelum deadline
- Location: Add lokasi untuk location-based tasks
- Notes: Detailed notes untuk setiap task
- Search & Filter: Cari tasks dan filter by status/category
- Mark Complete: Swipe atau tap untuk mark as done
- Edit/Delete: Update atau hapus tasks
🎯 Task Categories:
- Pekerjaan (Work tasks)
- Pribadi (Personal tasks)
- Belanja (Shopping list)
- Kesehatan (Health reminders)
- Custom categories (user-defined)
🔔 Reminder Options:
- 5 menit sebelumnya
- 15 menit sebelumnya
- 30 menit sebelumnya
- 1 jam sebelumnya
- 1 hari sebelumnya
Booking Calendar System
Kelola appointment dan booking dari customer
📆 Booking Calendar Screen
Comprehensive booking management system dengan calendar view. Customer bisa booking appointment via WhatsApp, dan business owner manage bookings dalam calendar interface.
✨ Key Features:
- Calendar View: Month/week/day views dengan react-native-calendars
- Booking List: Daftar semua bookings dengan detail
- Status Management: Pending, Confirmed, Completed, Cancelled, No-show
- Customer Info: Nama, phone, service, notes
- Time Slots: Manage available time slots
- Quick Actions: Confirm, cancel, reschedule booking
- Search & Filter: Cari booking by customer atau date
- Notifications: Auto-send reminder ke customer
- Calendar Sync: Integrate dengan Google Calendar (optional)
📊 Booking Status Colors:
- 🟡 Pending: Menunggu konfirmasi
- Confirmed: Sudah dikonfirmasi
- 🟢 Completed: Selesai
- 🔴 Cancelled: Dibatalkan
- ⚫ No-show: Customer tidak datang
🔄 Booking Flow:
Analytics & Reports
Monitor performance dan insights bisnis
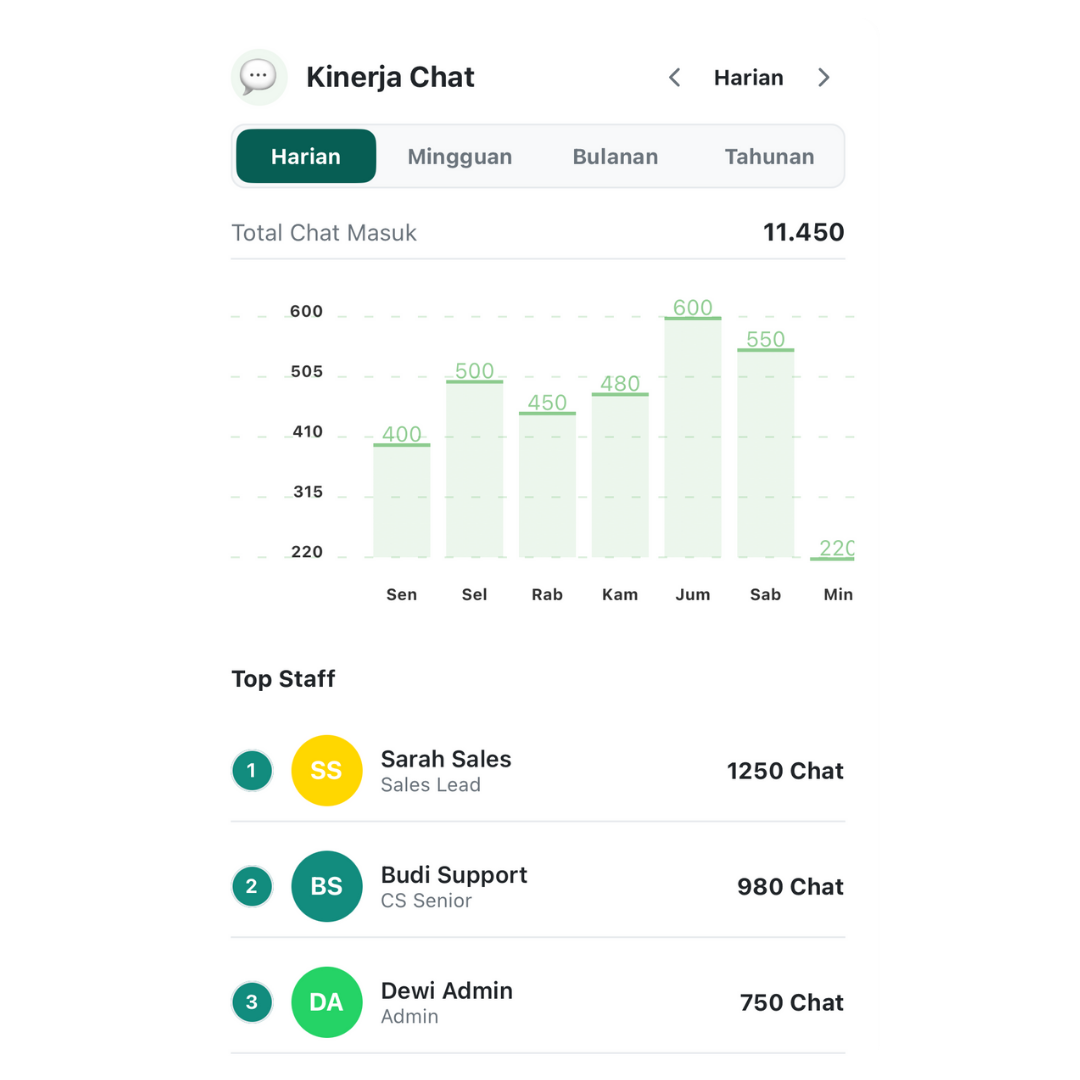
📈 Analytics Dashboard
Dashboard analytics untuk monitor metrics penting: message volume, response rate, broadcast performance, AI effectiveness, dan customer engagement.
📊 Key Metrics:
- Total Messages: Incoming + outgoing messages
- Response Rate: % messages yang dibalas
- Average Response Time: Rata-rata waktu respon
- Active Conversations: Jumlah chat aktif
- Broadcast Stats: Delivered, read, clicked
- AI Performance: Auto-reply rate, accuracy
- Booking Stats: Total bookings, completion rate
- Customer Growth: New contacts over time
📉 Charts & Visualizations:
- Line chart: Message volume over time
- Bar chart: Messages by day/hour
- Pie chart: Message types breakdown
- Heat map: Peak activity hours
API Integration
Integrate WatBis dengan sistem eksternal Anda
Authentication
Semua API requests memerlukan Bearer token authentication. Dapatkan API token dari Settings → Developer → API Keys.
📨 Send Message API
Kirim pesan WhatsApp dari sistem eksternal ke customer.
📥 Webhook Events
Setup webhook URL untuk receive real-time events (incoming messages, status updates, dll).
👥 Contacts API
📢 Broadcast API
🔄 Flow API
Webhooks Configuration
Receive real-time events dari WatBis
Setup Webhooks
Buat Endpoint di Server Anda
Setup HTTP endpoint yang bisa receive POST requests dari WatBis (e.g., https://yourdomain.com/webhooks/watbis)
Configure di WatBis
Masuk ke Settings → Developer → Webhooks, input URL endpoint Anda, pilih events yang mau di-subscribe.
Verify Webhook
WatBis akan kirim verification request. Endpoint Anda harus return challenge code untuk verify.
Start Receiving Events
Setelah verified, webhook aktif dan Anda akan receive events real-time.
📡 Available Webhook Events
- message.received: New message dari customer
- message.sent: Message successfully sent
- message.delivered: Message delivered ke customer
- message.read: Customer read message
- message.failed: Message failed to send
- broadcast.completed: Broadcast campaign selesai
- flow.submitted: Customer submit flow form
- booking.created: New booking created
- booking.updated: Booking status changed
🔐 Webhook Security
- Always verify webhook signatures
- Use HTTPS for webhook URLs
- Implement retry logic untuk failed webhooks
- Log all webhook events untuk debugging
Troubleshooting
Solusi untuk masalah umum
❌ Masalah Umum & Solusi
Q: Tidak bisa connect WhatsApp Business
Solusi:
- Pastikan Access Token valid dan tidak expired
- Cek Phone Number ID sudah benar
- Verify WhatsApp Business Account sudah verified di Meta
- Test koneksi dengan Meta Business API langsung
- Regenerate Access Token jika perlu
Q: Broadcast tidak terkirim
Solusi:
- Cek quota broadcast masih tersedia
- Template harus sudah approved Meta
- Pastikan recipients sudah opt-in
- Variables sudah diisi semua (tidak ada yang kosong)
- Media file size tidak melebihi limit (image: 5MB, video: 16MB)
Q: AI tidak membalas pesan
Solusi:
- Pastikan AI Assistant sudah di-enable di Settings
- Cek subscription plan support AI features
- Test koneksi AI backend dari Settings
- Review AI logs untuk error messages
- Pastikan knowledge base sudah diupload
Q: Template ditolak Meta
Alasan Umum:
- Content terlalu promotional/spam
- Tidak provide value ke customer
- Grammar atau formatting error
- Mengandung konten yang dilarang policy Meta
- Variable tidak dijelaskan dengan jelas
Solusi: Review WhatsApp Business Policy, revisi template, submit ulang dengan perubahan.
Q: Flow tidak bisa di-publish
Solusi:
- Pastikan semua required fields sudah diisi
- Validate flow structure (no broken navigation)
- Test flow di preview mode dulu
- Check Meta Business API status
- Ensure Phone Number verified untuk Flows
Q: Webhook tidak receive events
Solusi:
- Cek webhook URL accessible dari public internet
- Pastikan endpoint return 200 OK untuk requests
- Verify webhook signature di code
- Check webhook logs di WatBis dashboard
- Test webhook dengan tool seperti webhook.site
- 📧 Email: support@watbis.com
- 💬 WhatsApp: +62 812-3456-7890
- 🌐 Help Center: help.watbis.com
- 📚 Community Forum: community.watbis.com
Frequently Asked Questions
Pertanyaan yang sering ditanyakan
💰 Pricing & Billing
Q: Berapa harga WatBis?
A: WatBis menawarkan beberapa plan:
- Starter: Rp 299.000/bulan - 1.000 broadcast/bulan
- Professional: Rp 599.000/bulan - 5.000 broadcast/bulan + AI
- Business: Rp 1.299.000/bulan - 20.000 broadcast/bulan + Full features
- Enterprise: Custom pricing - Unlimited + Priority support
Q: Apakah ada free trial?
A: Ya! WatBis provide 14-day free trial untuk semua plan (kecuali Enterprise). Tidak perlu credit card untuk trial.
Q: Bagaimana cara upgrade/downgrade plan?
A: Masuk ke Settings → Billing → Change Plan. Upgrade langsung aktif, downgrade berlaku di billing cycle berikutnya. Pro-rated refund untuk downgrade.
🔧 Technical & Integration
Q: Apakah bisa integrate dengan CRM/ERP?
A: Ya! WatBis menyediakan REST API untuk integration:
- Send Message API - kirim pesan dari sistem Anda
- Webhook - receive incoming messages real-time
- Contacts API - sync database customer
- Broadcast API - trigger campaign dari sistem eksternal
Q: Apakah data aman?
A: Sangat aman. WatBis implement:
- End-to-end encryption untuk messages
- ISO 27001 certified infrastructure
- Regular security audits
- GDPR compliant
- Data backup & disaster recovery
🤖 AI Features
Q: Bagaimana cara kerja AI Assistant?
A: AI powered by GPT-4 yang di-train dengan business context Anda. AI bisa jawab pertanyaan customer, process orders, handle bookings, dan escalate ke human jika perlu.
Q: Apakah AI bisa salah jawab?
A: AI sangat akurat jika di-train dengan data yang baik. Namun tetap ada kemungkinan error. Best practice: monitor AI responses awal, provide fallback ke human untuk complex queries, dan continuous training dengan knowledge base.
📢 Broadcast & Templates
Q: Kenapa template harus di-approve Meta?
A: WhatsApp Business Policy mensyaratkan semua template di-review untuk mencegah spam dan protect user experience. Approval biasanya memakan waktu 1-2 hari kerja.
Q: Berapa lama review template?
A: Biasanya 1-2 hari kerja. Jika urgent, bisa contact Meta Business Support untuk expedite review (khusus verified business).
Q: Apakah bisa broadcast tanpa template?
A: Tidak. WhatsApp Business API mensyaratkan template untuk semua business-initiated messages. Template adalah compliance requirement dari Meta.
📱 Mobile App
Q: Apakah ada versi web/desktop?
A: Ya! Selain mobile app (iOS/Android), WatBis juga tersedia di:
- Web App: app.watbis.com - akses dari browser
- Desktop App: Download untuk Windows/Mac
- Sync: Semua data sync real-time across devices
Q: Bisa multi-user/team collaboration?
A: Ya (plan Business ke atas). Features:
- Add team members dengan role-based access
- Assign conversations ke specific agents
- Internal notes & comments
- Activity logs untuk audit
- Performance tracking per agent
Get Support
Kami siap membantu Anda
Help Center
help.watbis.com
Knowledge base & tutorials
Phone Support
Enterprise only
Dedicated phone line untuk Enterprise customers
- Email & WhatsApp: Senin-Jumat 09:00-18:00 WIB, Sabtu 09:00-15:00 WIB
- Help Center & Docs: 24/7 self-service
- Enterprise Phone: 24/7 priority support
🔗 Official Links
- Website: watbis.com
- Web App: app.watbis.com
- Documentation: docs.watbis.com
- Status Page: status.watbis.com
- Facebook: /watbis
- Instagram: @watbis
- Twitter: @watbis
- LinkedIn: /company/watbis
📚 Training & Certification
- Basic Training: 2-day workshop untuk new users (Free)
- Advanced Training: Deep dive into automation & AI (Rp 2.5 juta)
- Developer Training: API integration & webhook setup (Rp 3.5 juta)
- Certification: Certified WatBis Professional (Rp 5 juta)
Daftar training via training@watbis.com
Additional Resources
Tools dan resources untuk maksimalkan WatBis
📱 Official WhatsApp Resources
- WhatsApp Business Platform
- WhatsApp Business API Documentation
- WhatsApp Business Policy
- Meta Business Suite
🛠️ Developer Tools
API Explorer
Interactive API testing tool untuk test endpoints
Webhook Tester
Test dan debug webhook integrations
SDKs & Libraries
Official SDKs untuk PHP, Node.js, Python, Ruby
Code Examples
Sample code & integration examples
💼 Success Stories
Lihat bagaimana bisnis lain menggunakan WatBis untuk growth:
- Toko Fashion: Omset naik 300% dalam 3 bulan dengan AI Chat & Broadcast
- Klinik Kecantikan: 95% booking via WhatsApp, hemat waktu admin
- F&B: 70% repeat order dari auto follow-up AI
- E-commerce: Response time turun dari 2 jam ke 2 menit dengan AI
- Travel Agency: Handle 500+ inquiries/hari dengan 2 staff
🎁 Free Resources
Template Library
100+ ready-to-use message templates (free download)
Design Assets
Graphic templates untuk broadcast messages
Excel Templates
CSV templates untuk import contacts & products
E-books & Guides
Free guides: WhatsApp Marketing, AI Chatbots, dll
Best Practices
Tips untuk maximize hasil dengan WatBis
Message Best Practices
- Personalize: Selalu gunakan nama customer dalam message
- Be Concise: Keep messages short dan to the point
- Use Emojis: Moderate emoji usage untuk friendly tone
- Add Value: Setiap message harus provide value ke customer
- Clear CTA: Always include clear call-to-action
- Timing: Kirim message di waktu yang tepat (avoid late night)
- Frequency: Jangan spam - max 2-3 broadcasts per week
🤖 AI Assistant Best Practices
- Train Properly: Upload comprehensive knowledge base
- Set Clear Boundaries: Define what AI can/cannot handle
- Human Escalation: Always provide path to human support
- Monitor & Improve: Review AI logs dan improve responses
- Test Regularly: Test AI dengan different scenarios
- Update Knowledge: Keep knowledge base up-to-date
📢 Broadcast Best Practices
- Segment Audience: Target specific groups untuk relevance
- A/B Testing: Test different templates untuk optimize
- Track Metrics: Monitor open rate, click rate, conversion
- Optimal Timing: Send saat audience paling aktif
- Quality over Quantity: Better fewer high-quality broadcasts
- Follow Regulations: Always comply dengan WhatsApp policies
🔐 Security Best Practices
- Strong Passwords: Use complex passwords untuk account
- 2FA: Enable two-factor authentication
- API Keys: Keep API keys secure, rotate regularly
- Access Control: Use role-based access untuk team
- Audit Logs: Regularly review activity logs
- Backup Data: Regular export untuk backup contacts & data
What's New
Update terbaru dan upcoming features
Recent Updates (October 2025)
- Enhanced Flow Builder: New component types & better preview
- AI Personality v2: More natural responses dengan emotion detection
- Advanced Analytics: New dashboard dengan AI insights
- Multi-language Support: AI support untuk 10+ bahasa
- Template Builder: Visual builder untuk create templates
- Performance Boost: 50% faster message delivery
🚀 Coming Soon
- Voice Messages: AI bisa send & receive voice notes
- Payment Integration: Accept payments via WhatsApp
- Video Messages: Send video dalam broadcast
- Advanced Automation: Visual workflow builder
- CRM Integration: Native integration dengan Salesforce, HubSpot
- Mobile App v2: Complete redesign dengan better UX
Siap Maksimalkan Bisnis Anda?
Mulai gunakan WatBis hari ini dan rasakan perbedaannya!
WatBis - WhatsApp Business Integration System
Automate, Scale, and Grow Your Business with AI-Powered WhatsApp Marketing
© 2025 Target AI. All rights reserved. Made with ❤️ in Indonesia


Download Target AI

Gabungkan semua Platform dalam 1 Aplikasi Target AI
Gabungkan semua Platform
dalam 1 Aplikasi Target AI


What’s new
Latest Posts
"Pantau info terbaru Target AI,
pusat inovasi otomasi multiplatform tanpa batas."


Siap Transformasi Bisnis dengan AI?
Let's talk.
Jangan ragu untuk berdiskusi, kami akan membantu Anda memilih fitur Target AI yang paling sesuai agar sistem bisnis Anda berjalan otomatis lebih cepat.
Adding {{itemName}} to cart
Added {{itemName}} to cart